 Boat maintenance is never fun, but it is an essential aspect of owning a boat. Being aware of the small things your boat needs year-round is always a good idea, even if you have hired through a reputable marina. Listed below are some tips to help you make your yachting life easier. Keep reading to learn how you can keep your boat in tip-top shape.
Whether we like it or not, boat maintenance is essential for boat owners to keep their boats functioning properly. Here are some tips from experts to make life easier. It may not be anyone’s favorite thing to spend their time doing, but boat maintenance is crucial for any boat owner, to ensure their boat is ready to sail safely and efficiently. Boat maintenance takes many forms, from the major modifications you may wish to make in the off-season, to small repairs on the go that keep your boat running smoothly.
Although we all have to act in a reactionary fashion to an extent – things do sometimes go wrong which need fixing the moment the problem rears its head – it is best to get ahead of problems and ensure the whole boat is in the best possible shape before setting off on a trip or launching for the season. This sort of preemptive boat maintenance can seem like an ever-expanding list of things that need doing, but our panel of experts is here to list some of the coming problems that can crop up on board to give you the best chance of getting ahead of potential boat issues.
Check your tiller steering
Does your yacht have emergency tiller steering? When was the last time you checked it? It is important to make sure everything still fits together and works correctly. A yacht I recently surveyed had wheel steering, and the steel tube for emergency steering had completely corroded away.
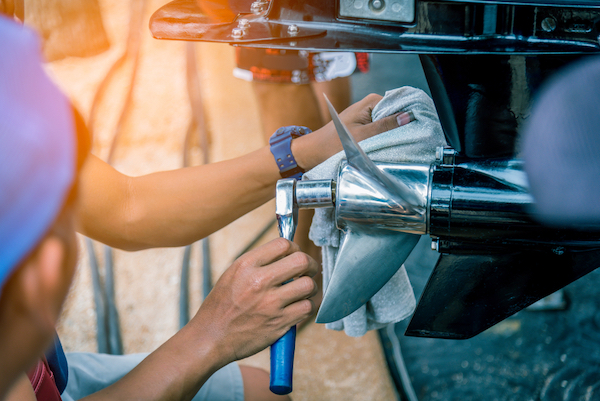
Fitting shaft anodes securely
Shaft anodes are by far the best way to prevent galvanic corrosion between the typical manganese bronze propeller (actually a modified brass) and stainless steel shaft, probably the most common combination. Shaft anodes will also help to prevent unwanted corrosion between the brass or bronze blades and hubs of folding or feathering propellers and the stainless pins that connect these together. Shaft anodes are simple things, basically, a short tube with rounded ends, cut in half lengthways so they can be fitted, then bolted back together onto the shaft.
Ideally, anodes should be fitted close to the P-bracket but not so close that it prevents water to flow through the cutlass bearing. A 25mm gap is about right. Many owners find that having fitted one at the beginning of the season, after a couple of months it has loosened so much that it rattles against the P-bracket or falls off when the bolts become completely detached. It has been said that applying Loctite to the bolts will prevent this, but the real answer is to fit the anode correctly.
Firstly, abrade the shaft lightly to ensure good electrical contact. Corrosion protection relies on the transfer of electrons and this will not happen if the shaft is fouled before the anode is fitted.
Next, put the anode onto the shaft and tighten the bolts, ensuring that the spaces between the halves are equal on both sides. Now comes the critical part. Take a hammer in each hand, at least 1lb in weight each but preferably two. Strike the two halves of the anode simultaneously with the two hammers, knocking them together. It will now be possible to tighten the bolts some more. Keep repeating the process until the bolts can no longer be turned. Your anode is now fixed until you decide to remove it.
Out of sight but not out of mind
Cooking by gas is still popular on yachts and any installation using gas cylinders needs careful management. As gas is heavier than air, leaks will sink into the bilges rather than disappear into the air, so it is vital you install a gas leak detector or gas sniffer onboard. However, it is best to stop leaks in the first place. The gas cylinder should be in a locker that is sealed off from the rest of the boat so that any leak can only escape out into the air or through an overboard drain, which should be regularly checked to ensure it remains clear.
The cylinder needs to be well secured in the locker and no other gear should bestow with it. When you come to inspect the gas system, it will probably be a mixture of fixed and flexible pipes. Check the flexible pipes by bending them in quite a tight curve to see if there are any cracks. Replace the hose if there is any cracking. Check all the connections to ensure they are tight and use a mixture of washing-up liquid and water to brush over the connections to ensure that there are no leaks.
Check your pop rivets
When the mast is down it’s easy to check the pop rivets used to secure fittings or a joint. Salt crystals get underneath rivets, especially if they are becoming loose, which can cause corrosion. Make sure you use the right type of rivets and they are secure. Avoid dissimilar metals touching each other; there are insulators available to help.
Check your steering cables & carry spares
Steering cables are often forgotten about. Although most boats are equipped with an emergency tiller, you really don’t want to travel far like this. Think of your emergency tiller as a way to get you to a shelter where you can set about replacing broken steering cables before going into the harbor. Check the condition of the cables and order spares before leaving.
Clean out your bilge
Have you ever noticed how much debris finds its way down into the bilge of the boat? The bilge on our Ovni is normally totally dry so we have no need to regularly pump it out. On one occasion we had been living aboard for about a year when we decided to flush the bilge through with fresh water. We were amazed to see how much general debris found its way to the suction head and mesh screen filter.
There was enough general gunk jamming the head that it would have compromised the bilge pump if we had needed it in anger. We now have a routine of flushing the bilge through with fresh water every few months to clear out any debris, which also has the benefit of ensuring a regular test of the bilge pumps.
Record your engine data
Some engine problems, like inefficient cooling due to a worn-out raw water pump, develop gradually over time and can go unnoticed until they become critical. The solution? Make a note of the normal operating temperatures and pressures from your engine every day in the logbook. Once the engine is warmed up, note down the RPM, temperature, oil pressure, and charging voltage; it is amazing how consistent these are until things go wrong.
Locating spares onboard
Long-distance cruising necessitates a high level of self-sufficiency. A large part of this is having the necessary spares to make repairs and replace broken equipment. The problem is finding the part you need when you need it. This problem is compounded by often having to store spares in highly inaccessible regions of the boat, like in the bilge under the bed in the guest cabin. One solution is to catalog all of our spares in detail in a spreadsheet describing the item (with linked photos in some cases) and where it is stored on the boat. We label our spares containers with their storage location so they go back in the right place.
One suggestion is to not label the boxes with their contents but rather mark a box as say Sundry Spares Box 14, with the contents of that box listed in your spreadsheet. You should keep laminated printouts of the spreadsheet in your chart table in case of IT issues.
Check the propeller is seized off
Before launching, make sure the propeller is correctly seized off. It’s amazing how often at a survey that I find propellers not fully seized. Make sure the anode is right for the water you are keeping the boat in predominantly, and that the bonding is working by using a multimeter set to ohms and resistance of less than 0.2.
Check your hatch handles
Handles stuck to hatches with glue are susceptible to failure over time, as the crew is degraded by the sun. An expert in maintenance once was beating to windward in a stiff breeze at night and didn’t notice that a handle on the forward-facing hatch had failed, resulting in a lot of water inside the forward cabin. The Lewmar handle was glued onto the hatch and over time, the glue had gradually degraded in the sun. Lewmar no longer makes this catch and the retrofit replacement has a screw through to a keeper plate on the outside of the hatch, making it much more secure.
But our experience is a timely reminder to check all hatch handles to make sure they are firmly in place before setting off. All the boat’s hatches had been tested by spraying fresh water over the seals; clearly a poor simulation of a big wave rushing over the topside of the boat. It is also a good idea to protect deck fittings from damaging UV; fabric covers for hatches will dramatically increase their life. Carrying homemade blanking plates for failed hatches and portholes is good seamanship. Consider what you could use that you already have on board to block a failed hatch from the outside quickly and easily.
Check your air filters
Diesel engines need a huge amount of air for combustion so regularly checking filters is a good habit to develop. Experts also replaced some of the engine systems such as the water filter and the exhaust. Experts recommend to take the opportunity to add a water separator to the fuel filter and re-route the cooling water hoses, reducing the total length of the freshwater hoses by nearly 1m.
Complete and original article published on yachtingmonthy.com